

Evaporative Cooling Maintenance Tips 2026: A Seasonal Guide
Table of Contents
Evaporative Cooler Service Frequency: When to Book Pre-Season Maintenance
A seasonal maintenance calendar you can actually follow
What a full annual service covers
When to book a second visit
Your Evaporative Cooler Maintenance Checklist for 2026
How to Clean an Evaporative Cooler: Step-by-Step
Cleaning the water reservoir and flushing the system
Checking water levels, float valves and distribution lines
Inspecting for leaks, corrosion and fan motor issues
Evaporative Cooling Pads: Cleaning and Replacement Guide
Water Quality and Hard-Water Management for Evaporative Coolers
Troubleshooting Common Evaporative Cooling Problems by Symptom
Measurable performance checks
Symptom-to-cause map
A diagnostic sequence that saves time
Safety First: DIY Limits and When to Call a Professional
Conclusion: Your Next Steps for a Cooler Summer
Frequently Asked Questions
Last Updated: October 14, 2026
Evaporative Cooler Service Frequency: When to Book Pre-Season Maintenance
Evaporative cooling maintenance works best when it starts before the heat does, and the same is true of any evaporative cooling maintenance routine.
Evaporative cooler service frequency is simple: book one full service every year, ideally in spring before the first hot spell.
Why spring? Because maintenance becomes a repair job by mid-summer. Parts are scarce, technicians are booked out, and you are stuck with a warm house.
A seasonal maintenance calendar you can actually follow
Most guides tell you what to clean but not when. The table below maps each task to the right season and a sensible interval, so you can plan around your own summer rather than guess.
Season | Timing | Tasks | Interval |
Pre-season | Early spring, before first hot spell | Full service: clean or replace pads, drain and flush sump, descale, test float valve, pump, distribution lines, fan motor, check for leaks and corrosion | Once per year |
Early summer | First month of regular use | Confirm water level, check pads for dry patches, listen for new fan noises, inspect for pooling water | Weekly for the first month |
Peak summer | Through the hottest months | Top up water, clear dust and debris from pads and grilles, check for leaks, confirm airflow at outlets | Fortnightly, or weekly in dusty or hard-water areas |
Mid-season (optional) | Mid-summer | Second full check if the cooler runs daily, the water is hard, or the household has pets | Once, if conditions warrant |
End of season | After the last hot spell | Drain system completely, clean pads and reservoir, cover the unit to keep out dust | Once per year |
What a full annual service covers
A typical annual service includes:
Cleaning or replacing the filter pads
Draining and flushing the water reservoir
Checking water levels and the float valve
Inspecting the water pump and distribution lines
Testing the fan motor and moving parts
Checking for leaks, rust and corrosion
When to book a second visit
If the cooler runs daily through summer, or the water is hard, plan a second check in January. It takes minutes and saves bigger problems later. Households near dusty or leafy blocks, or with pets that shed, should treat the mid-season check as standard rather than optional.
Pro Tip Set a recurring calendar reminder for the first week of spring and the last week of summer. Most premature cooler failures trace back to a missed end-of-season drain, not a mid-summer breakdown.
Your Evaporative Cooler Maintenance Checklist for 2026
An evaporative cooler maintenance checklist turns a vague "it still works" feeling into a clear pass or fail. Run through this list before summer starts, then repeat the quick checks monthly.
Before summer (full service):
Isolate power at the circuit breaker before touching anything
Remove and inspect all filter pads
Drain and flush the water reservoir
Clean mineral scale from the sump
Test the float valve and water supply valve
Check the water pump and distribution lines
Inspect the fan motor and bearings
Look for leaks, rust and corrosion
Test airflow at every outlet
Monthly through summer:
Check water levels and top up if needed
Clear dust and debris from pads and grilles
Listen for new noises from the fan
Check for water pooling near the unit
End of season:
Drain the system completely
Clean pads and reservoir
Cover the unit to keep out dust
Pro Tip Photograph the inside of your cooler before you start. It gives you a reference point and makes it obvious if scale or corrosion is building up between services.
How to Clean an Evaporative Cooler: Step-by-Step
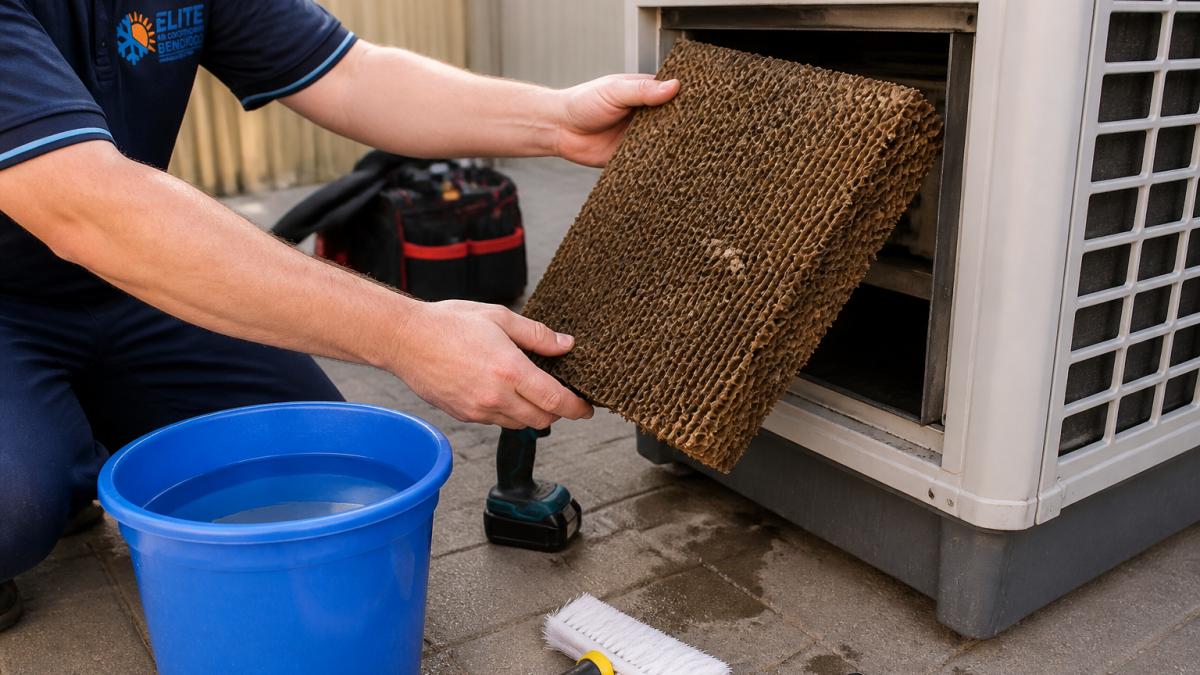
Cleaning an evaporative cooler is a straightforward job if you work in the right order: isolate power, clean the pads, flush the reservoir, then check the water system. The whole process takes most homeowners one to two hours.
Cleaning the water reservoir and flushing the system
The water reservoir, or sump, is where scale and sludge collect. Drain it fully, scoop out any debris, then scrub the walls with a soft brush and a mild cleaning solution. Rinse until the water runs clear, then flush the system with fresh water so no residue is left behind. Skipping this step is the most common reason a freshly cleaned cooler still smells musty.
Checking water levels, float valves and distribution lines
Set the water level so it sits just below the top of the pump intake. A float valve that sticks will either starve the pump or overflow the sump. Check the water distribution lines and nozzles too: blocked holes mean dry patches on the pads, which cuts cooling performance fast.
Inspecting for leaks, corrosion and fan motor issues
Look for water stains, rust spots and cracked hoses. Check the fan motor for play in the shaft and listen for grinding or squealing. A little lubrication on moving parts goes a long way.
Watch Out Never open the unit or remove pads without switching off the circuit breaker first. Water and live power are a dangerous mix, and a running fan can catch fingers.
Evaporative Cooling Pads: Cleaning and Replacement Guide
Evaporative cooling pads decide how well your system cools. Clean pads let air pass through wet material and drop the temperature.
Clean pads when you see dust, salt build-up or dry patches. Replace them when they are brittle, sagging, or coated in mineral scale that will not rinse out.
Pad symptom | What it means | What to do |
Light dust | Normal build-up | Rinse and reinstall |
White scale | Hard water minerals | Descale or replace |
Dry patches | Blocked water lines | Clear nozzles |
Brittle or sagging | End of pad life | Replace the set |
Always match the pad type to your model. A pad that is too thick or the wrong material can cut airflow and hurt performance.
Water Quality and Hard-Water Management for Evaporative Coolers
Hard water is the quiet killer of evaporative cooling systems. Every time water evaporates, it leaves minerals behind. Over a summer, that scale builds on pads, the sump and the pump.
Signs your water is causing trouble:
White or chalky deposits on pads
Scale in the sump that is hard to scrub off
A pump that sounds strained
Reduced airflow despite clean pads
To manage it, drain and refill the reservoir more often, descale the sump each service, and replace pads sooner than you otherwise would. If your water is very hard, ask about a water treatment option when you book a service.
Troubleshooting Common Evaporative Cooling Problems by Symptom
Most evaporative cooling faults show up as one of a handful of symptoms. Match the symptom to the likely cause before you call anyone, but first, run a few measurable checks so you are diagnosing with evidence rather than guesswork.
Measurable performance checks
Visual inspection only tells you so much. These simple checks give you a baseline you can compare against after each service.
Airflow: hold a hand or a sheet of paper at each outlet. You should feel a steady, even flow. A noticeable drop at one outlet points to a blocked branch duct or a collapsed pad on that side.
Water distribution: with the pump running and pads removed, watch the water trickle down each pad face. Every pad should be evenly wet from top to bottom. Dry vertical stripes mean blocked nozzles or a kinked distribution line.
Temperature drop: measure the air temperature at the outlet and at the return grille. A working cooler on a dry day typically delivers a noticeable drop; if the outlet air is barely cooler than the room, the pads are dry, the pump is failing, or airflow is restricted.
Humidity: a working cooler raises indoor humidity. If the air feels dry and warm, water is not reaching the pads.
Water use: note how often you top up. A sudden increase in water consumption usually means a stuck float valve or a leaking sump.
Symptom-to-cause map
Weak airflow: clogged pads, blocked outlets, collapsed ducting, or a failing fan motor
Warm air: dry pads, blocked water lines, a pump that is not running, or a pad that is the wrong thickness for the model
Musty smell: dirty reservoir, stale water, or mould on pads
Water pooling: blocked drain, cracked sump, or a stuck float valve
Loud grinding or squealing: worn motor bearings or loose fan parts
Unit keeps tripping: electrical fault, so isolate power and call a professional
Excessive water use: stuck float valve, leaking sump, or overflowing reservoir
A diagnostic sequence that saves time
Work in this order so you do not chase the wrong fault:
Confirm power is on and the pump is running.
Check the water level and float valve.
Confirm water is reaching the pads evenly.
Check pads for scale, dryness, or collapse.
Check airflow at every outlet.
Listen to the fan and feel for vibration.
Inspect for leaks, rust, and corrosion.
If a fix needs the unit opened, wiring touched, or the motor removed, stop and get it looked at. The cost of a call-out is far less than the cost of a mistake.
Safety First: DIY Limits and When to Call a Professional
Some jobs are safe for a careful homeowner. Others are not, and knowing the line matters more than saving a few dollars.
Safe to do yourself:
Cleaning and rinsing pads
Draining and flushing the reservoir
Clearing debris from grilles
Checking water levels
Visual checks for leaks and rust
Call a professional for:
Any electrical work or wiring
Fan motor repair or replacement
Pump replacement
Gas or refrigerant work on related systems
Repairs that need the unit dismantled
Key Takeaway The rule is simple: if the job needs the power on, a ladder at height, or the unit opened up, it is a professional job. Everything else you can handle with a brush, a bucket and an hour.
Conclusion: Your Next Steps for a Cooler Summer
A cooler that gets serviced every spring will outlast one that gets ignored, and it will keep your home comfortable through the worst of the heat. The work is not complicated, but it does need to happen on schedule.
If your system is due for a service, or you would rather have it done properly, we can help. Elite Air conditioning Bendigo offers free on-site heating and cooling quotes, impartial advice across all major brands, and expert design and load calculations.
Request a quote with Elite Air conditioning Bendigo and start next summer with a cooler that runs at its best.
Frequently Asked Questions
How often should evaporative cooling be serviced?
A full professional service is best done annually, ideally in early spring before the cooling season starts. If you live in a dusty area or use the cooler daily through summer, a mid-season check of pads and water quality is also wise. Between services, drain and flush the system every four to six weeks during heavy use. Regular servicing keeps the unit running efficiently and helps you avoid mid-summer breakdowns.
What maintenance is required for an evaporative cooler?
Key tasks include cleaning or replacing the cooling pads, draining and flushing the water reservoir, checking the float valve and water distribution lines, inspecting for leaks and corrosion, and lubricating the fan motor bearings. You should also clear dust and debris from the cabinet and check that the water pump is circulating properly. Following a seasonal checklist ensures nothing gets missed.
Can I run vinegar through my evaporative cooler?
White vinegar can help dissolve mineral scale on pads and in the water reservoir, but it should be used sparingly and never left in the system. A diluted solution of one part vinegar to four parts water is enough for descaling. After cleaning, flush the system thoroughly with fresh water to remove any residue. For stubborn scale or if you are unsure, a professional service is safer.
When should I clean or replace evaporative cooler pads?
Inspect pads at the start of each cooling season and every month during heavy use. Clean them when you see dust or light mineral buildup. Replace them if they are sagging, brittle, or have significant scale that cleaning cannot remove. Pads typically last one to two seasons, depending on water quality and how often the cooler runs. Clean pads directly affect cooling performance and airflow.
Request a Quote

Comments